
Python Web Scraping for Beginners: Complete Step-by-Step Guide (2026)
Learn Python internet scraping step by step, from HTML basics and BeautifulSoup to pagination, data cleaning, dynamic JavaScript pages, and common beginner mistakes.
Apr 9, 2026


Beginner-friendly, step-by-step guide to training AI image models: quickstart, dataset methods, inline hyperparams, costs, validation, and troubleshooting.
AI art has exploded in popularity, allowing anyone to generate stunning visuals from simple text prompts. But what if you want to go beyond generic outputs and create something truly unique—like images in your personal style or featuring specific subjects? The answer is training your own AI art model (which often means fine-tuning an existing one).
This guide is designed for beginners: we'll start with a Quickstart for fast results, then build step-by-step. You'll learn by doing, with checklists, examples, and fixes to make it easy to follow. Advanced users can dive into inline hyperparameters, templates, and pro tips.
Before jumping in, here's what beginners need—no advanced skills required:
Basic Tools: A computer with internet access. For the Quickstart, use a free no-code platform like Hugging Face's DreamBooth (sign up at huggingface.co) or Replicate.com.
Images: 15–30 of your own photos or artwork (we'll explain how to collect them).
Time and Budget: 30 minutes to a few hours for your first try; free options available, or $2–$100 for cloud tools like Google Colab (free tier for basics).
Skills: No coding needed at first—follow the UI. If you're new to AI, that's okay; we'll define terms as we go.
Optional: A free Google account for Colab notebooks if you want more control.
Off-the-shelf image generators are great, but they produce generic results. Training (actually fine-tuning) a pre-trained model on your images lets you:
Before starting, always prioritize responsibility to avoid harm:
Consent: Get written permission to use any person's images (e.g., from friends or family).
Copyright: Only use your own or public-domain images; don't upload copyrighted artworks without a license.
Bias Check: After training, generate samples in different contexts (e.g., diverse backgrounds) and review for harmful stereotypes or inaccuracies.
Transparency: Label AI-generated images as such, especially if sharing publicly (e.g., "AI-generated via custom model").
Data Security: Store datasets securely and delete them if requested by anyone in the images.
Ethical AI builds trust and prevents legal issues. For more, see resources in the Further Reading section.
1. Collect 15–30 clear photos of your subject (varied poses, angles & lighting). — Time: 10–30 min.
Example: For a pet model, snap photos of your dog sitting, running, and sleeping.
2. Zip them and upload to a no-code training web tool or a cloud GPU notebook that supports subject fine-tuning. — Time: upload depends on internet.
3. Choose a unique trigger token (one short unusual word, e.g., mytoken).
4. Start training with default settings and wait for the job to finish — usually minutes → ~1 hour on free tiers.
5. Test with a simple prompt like:
A portrait of <mytoken> in soft studio light.
Do this now (mini ethics check): get consent for any real person in the photos and do not upload copyrighted artwork without permission.
Expected result: 5–20 generated images that show recognizable subject/style hints. If that works, you’ve completed a full generation cycle. If results are poor, continue with full steps below.
Write a single sentence that answers:
Example: “Generate gallery-quality portraits of my cat in fantasy styles for social media posts, under $5.”
Why: your goal decides dataset size, method choice, and stopping rules.
Building on your goal, choose from these beginner-friendly methods. (Fine-tuning means tweaking a big pre-trained model like Stable Diffusion—easier than starting from scratch.)
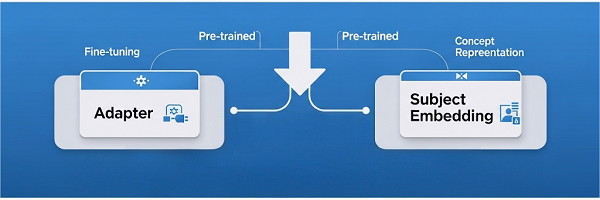
1. Adapter (LoRA-style): a tiny plugin that changes only part of a big model for styles or quick changes, so it behaves differently — fast and low-cost. (LoRA = Low-Rank Adaptation, a efficient way to customize without huge resources.)
2. Subject embedding (token-based): teaches the model a new token that stands for a person or object so prompts can summon it easily.
3. Conditional adapter: accepts extra inputs (pose maps/masks) so generated images follow a supplied composition. (advanced; skip for now if new.)
4. Full training from scratch: build a whole new model — requires huge datasets and clusters (usually not needed, for pros/teams).
Want photos of a person/object → Subject embedding.
Want to capture/apply a style → Adapter.
Need pose/structure control → Adapter + Conditional maps (advanced).
Building a new base model → Full training (not for beginners).
The dataset is your model's foundation—curate it well for best results.
Subject likeness: 15–50 (start with 20).
Style capture: 30–200.
Pose-conditioned: 30–500 pairs.
Full training: 10k+ (teams/organizations).
Sharp, well-lit, minimal blur.
Minimal distractions (e.g., no other people in subject images).
Diverse angles, lighting, expressions, clothing/poses.
/my_project
/images
img_001.jpg
img_002.jpg
...
captions.csv
/validation (5–10 held-out images)
/maps (optional: pose/mask files)
filename,caption
img_001.jpg,"photo of mytoken smiling, 3/4 profile, daylight"
img_002.jpg,"photo of mytoken looking left, studio lighting"
If using subject embedding, always include the trigger token (mytoken) in captions.
Backup tip: Keep the original images safe (external drive/cloud) before preprocessing.
Time expectation: 10–60 minutes to collect & organize small datasets.
Simple steps beginners can do with free image tools or online editors. No code needed.
1. Resize: pick a consistent resolution. 512×512 is a good beginner default. (If you want higher detail later, try 768×768.)
2. Normalize: many trainers handle normalization; if not, convert images to standard color space (sRGB), most tools do this automatically.
3. Augment (only if dataset small): horizontal flip, ±10° rotate, small color jitter. Do not change identity for subject datasets.
4. Split: move ~10% of images into /validation (minimum 5 images). These are held-out images you never train on; use them only to test.
Why: consistent input sizes and gentle augmentation improve training stability and generalization.
Pick the path that matches your skill/budget.
No-code web trainer (easiest): upload dataset and follow UI. No install. Good for first run.
Cloud GPU notebook (intermediate): use Google Colab (colab.research.google.com)—free tier with GPU access; more flexible.
Local GPU (advanced): install Python and ML libraries, run locally if you have a supported GPU.
Small fine-tune: GPU with ≥8 GB VRAM is fine.
Faster jobs / larger datasets: 16–24+ GB VRAM recommended.
Small fine-tune (10–100 images): 0.5–6 GPU hours → $2–$100 cloud-dependent.
Medium fine-tune (100–500 images): several hours → $10–$300.
Small GAN experiments: tens of GPU hours → $50–$500+.
Full base training: hundreds → thousands GPU hours → $1k–$100k+.
Micro-fix (out-of-VRAM): if you hit memory errors, reduce batch size to 1, enable mixed precision (fp16), or switch to a GPU with larger VRAM.
Pick one from Step 2. Use your tool's interface or copy these into a Colab notebook.
Use when: you want to apply/adjust a style or make quick iterations.
Starter hyperparameters:
Tool-agnostic pseudo-command
train_adapter --base <base> --images ./images --captions ./captions.csv \
--r 8 --lr 1e-4 --bs 2 --steps 500 --out ./adapter
(Replace arguments with your trainer’s syntax.)
What to do while training
Generate test images every 200 steps (see Step 7). If bland → Add steps/data. If copies training images → Reduce steps.
Expected after first run: 5–20 generated images that show some stylistic changes.
Estimated cost/time: 0.5–6 GPU hours; $2–$100 (cloud).
Use when: your goal is to generate recognizable images of a person or object.
Required extra: Class (regularization) images — 50–200 generic images of similar subjects (e.g., other people) to prevent memorization.
Starter hyperparameters:
Pseudo-command
train_subject --base <base> --images ./images --captions ./captions.csv \
--class_images ./class --lr 5e-5 --steps 1000 --out ./subject_token
What to do while training
Test with validation (Step 7). If memorizes → More class images. If no subject → Check token in captions.
Expected after first run: produced images should show subject likeness in simple settings (not perfect but recognizable).
Estimated cost/time: 0.5–6 GPU hours; $2–$100.
Do this at every checkpoint to avoid wasting time.
Generate images with the 5 fixed prompts from each checkpoint.
Compare to validation images (held-out).
Spot Issues: Overfitting (exact copies) → Stop early, add diversity. Underfitting (generic) → More steps/data.
If validation quality stops improving for 2–3 checkpoint intervals → stop and export the best checkpoint.
If artifacts increase after some steps → revert to the previous checkpoint.
1. Export adapter or subject weights from your training tool.
2. Load into your image-generation UI or inference endpoint.
3. Sample prompts:
Local inference for personal use has low ongoing cost.
Production hosting or heavy API use scales costs with traffic — plan accordingly.
| Symptom | Likely cause | Quick fix (do it now) |
| Output reproduces training set too closely | Overfitting / memorization | Reduce steps; add class images; diversify dataset |
| Subject looks wrong in new poses | Dataset lacks pose/angle variety | Add images with more poses, backgrounds, and lighting variations |
| Artifacts or strange textures | Training instability / learning rate too high | Lower learning rate; roll back to earlier checkpoint; add light augmentations |
| Outputs look bland or generic | Underfitting (not enough learning) | Increase steps slightly; add more images; raise adapter rank (if applicable) |
| Out of memory / VRAM error | Batch size or resolution too high | Lower batch size (1 if needed); enable fp16/mixed precision; reduce resolution |
| No GPU access / hardware limit | Local machine has no GPU or insufficient VRAM | Switch to a cloud GPU notebook or no-code trainer; reduce resolution/batch size; enable fp16 |
| Poor results on free tiers / quota limits | Free sessions time out or have strict quotas | Split training into smaller runs (use checkpoints); temporarily upgrade to paid GPU; run small test runs locally first |
| GAN mode collapse (GAN only) | Training instability | Lower learning rate; add augmentation; use stabilization tricks (e.g., spectral norm) |
Once basics work:
Conditional adapter for pose control: create paired maps (pose skeletons/masks) and train the model to accept maps as input.
Small GAN path for stylistic exploration: use progressive resizing and stabilization techniques; expect more trial-and-error.
Full base-model training: requires tens of 10K+ captioned images and distributed multi-GPU infra — typically for research labs or companies.
Start with the Quickstart and one simple method (Adapter or Subject embedding). The dataset is key, so curate it carefully. Iterate with short runs and checkpoints; you’ll have a custom model fast! Share your creations online responsibly.
< Previous
Next >


 Cancel anytime No credit card required